Using Relays with Arduino or Raspberry Pi
If you intend to intermittently turn a motor on and off using Arduino or Raspberry Pi, you can employ relays. While this approach may be considered somewhat old-fashioned, it has several advantages:
- It is straightforward to implement and requires minimal components.
- It provides excellent isolation between the high-current motor, which generates a lot of noise, and the delicate construction of the Pi and Arduino.
- It enables you to work with high currents (when the relay is selected correctly).
- Ready-made relay modules are available that can be used directly with Raspberry Pi or Arduino.
However, there are some drawbacks to working with relay modules:
- They are relatively bulky.
- They can only turn the motor on or off, not control its speed.
- Since relays are electromechanical devices, they typically endure no more than 10 million switching operations before something breaks.
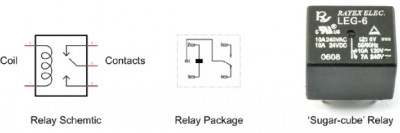
Electromechanical Relays
The image below displays perhaps the most common type of relay, often referred to as a "
sugar cube" relay due to its shape, though typically these relays are black, not the color of actual sugar cubes.
When a current (typically around 50 mA) flows through the relay coil, it acts as an electromagnet and attracts two contacts towards each other, creating a connection between them. These contacts are designed to handle high voltage and current, capable of switching tens of amperes.
Although we'll use relays to control a DC motor, the relay itself functions as a simple switch, allowing you to control almost anything with it.
These types of relays are called "
single-pole changeover" relays (abbreviated as SPCO), as they have not just two contacts that can be either closed or open, but three: the
common contact (usually labeled COM) and two other contacts:
normally open (NO) and
normally closed (NC). In this context, "normally" means "without power applied to the relay coil." Therefore, NO and COM contacts will be open (not connected) until the relay coil is energized. The normally closed contact operates in the opposite manner, where the NC and COM contacts are closed by default but will disconnect when the relay coil is energized.
In standard situations, only two relay contacts—NO and COM—are used to control the connected device.
Using Relays with Arduino or Raspberry Pi
When using relays with Raspberry Pi or Arduino, you will need relays designed for a 5V coil voltage. Relay coils consume too much current (around 50 mA) to be controlled directly by Raspberry Pi or Arduino, so in both cases, you'll need to include a small transistor in the circuit to manage the relay coil at 5V.
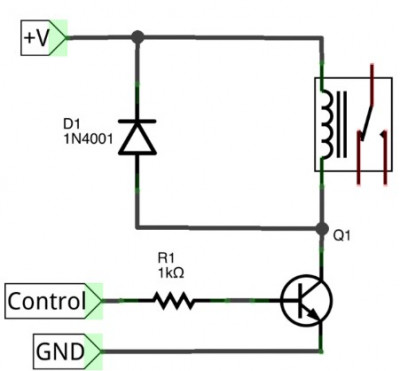
As mentioned, the relay coil is designed to operate at 5V and requires approximately 50 mA of current, which is too much for Arduino and excessive for a Raspberry Pi GPIO pin. Therefore, similar to what we did in the "Experiment: Controlling a DC Motor" section, we'll use a transistor to control the relay coil, with the relay coil acting as the "load" instead of the motor.
This setup is practical only when the motor (or any other load you want to control) consumes a significant amount of current, making it unsuitable for direct control using just a transistor.
Like the motor, when relays are switched on and off, they can produce voltage spikes, so it's necessary to include a diode in the circuit.
It's evident that in the circuit shown above, the switching part of the relay is electrically isolated from the part with the coil. This reduces the likelihood of electrical interference, voltage spikes, and other harmful electrical phenomena reaching your Arduino or Raspberry Pi.
Since a relay powered by a 5V coil requires only about 50 mA of current, a budget transistor like 2N3904 will suffice in our case.
Relay Modules
If you have multiple devices you want to control, and they adhere to the previously mentioned limitation of relay-based control (typically limited to on/off switching), it would be convenient to acquire a relay module, like the one shown in Fig. 7.9.
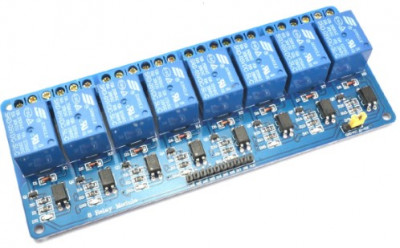
These modules are inexpensive and can be readily purchased on online marketplaces like AliExpress. They typically come with the relays themselves, transistors to control them, and small LEDs to help identify which specific relay is activated. Given their setup, such relay modules can be connected directly to Raspberry Pi or Arduino.
Relay modules may contain varying numbers of relays, from a single relay to eight or more. Usually, relay modules have the following contacts:
-
GND - Ground.
-
VCC or 5V - Connect this contact to the 5V pin on Raspberry Pi or Arduino; when you activate it, it can supply voltage to the relay coils.
-
Data pins - Each data pin controls one of the relays. Sometimes these pins may be active high, meaning they activate the relay when transitioning to a high state. In other cases, the data pin may be active low, activating the relay when the GPIO pin goes low.
Additionally, relay modules feature screw terminals connected directly to the working relay contacts that close the power circuits of the controlled devices.