Stepper motors

  • Image

    The image showcases three examples of stepper motors. Miniature motors like the one depicted on the left are used for adjusting lens components in compact cameras or smartphones. In the center, there is a 5V stepper motor with a built-in gearbox, which houses both the stepper motor and the reducer. On the right, you can see a stepper motor typical for printers.

    As implied by their name, stepper motors rotate in a series of short steps. This sets them apart from free-rotating motors. A stepper motor will take as many steps as specified, allowing you to precisely determine how many steps it has taken. This characteristic is one of the reasons why stepper motors are widely used in both conventional and 3D printers. In regular printers, they precisely position paper, while in 3D printers, they control the movement of the print bed and nozzle.
  • The diagram below illustrates the operation of a stepper motor, more specifically, the operation of a bipolar stepper motor. Another type of stepper motor, unipolar stepper motors, will be discussed in the section "Unipolar Stepper Motors" later.

    In a bipolar stepper motor, there are typically four coils. The coils that are positioned opposite each other are connected in such a way that they operate synchronously. All the coils are located on the stationary stator of the motor, eliminating the need for a rotating commutator and brushes as found in DC motors.

    Image

    The rotor of a stepper motor is designed as a series of magnetized teeth with alternating north (N) and south (S) poles (there are usually more teeth on the rotor than shown in the diagram). Each coil can be energized to become either a north or a south pole, depending on the current direction through the coil (reminding you of H-bridges, isn't it?). Coils 1 and 3 work together so that when coil 1 becomes a south pole, coil 3 also becomes a south pole. The same applies to coils 2 and 4.

    Let's start with figure a: when coil 1 (and consequently, coil 3) are energized to become south poles (S), the rotor rotates counterclockwise until the nearest rotor teeth with a north pole (N) magnetization align with coils 1 and 3 (as shown in figure b). To continue rotating counterclockwise, on the next step (figure c), current needs to be applied to coils 2 and 4 to make them north poles (N). Then, the nearest rotor teeth with south pole (S) magnetization will be attracted to coils 2 and 4 (figure d).

    Each of these actions rotates the motor's rotor by one step. To continue rotating counterclockwise, coil 1 needs to be magnetized as north (N) again, as shown in the table.

    Table: Sequence of actions for counterclockwise rotation of a stepper motor
    Image

    Dashes in the table indicate that the coil does not influence the rotor's rotation at that moment and should be de-energized. To enhance the motor's torque, these de-energized coils can be energized in such a way that their magnetization polarity matches the polarity of the rotor tooth beneath them (as shown in the table below).

    Revised sequence of coil switching for counterclockwise rotation of a stepper motor
    Image

    You might wonder what would happen if you started with coils 2 and 4 instead of coils 1 and 3. In that case, a different pair of coils would facilitate bringing the rotor teeth to the correct position. To change the direction of the rotor's rotation, you would simply reverse the order of coil switching indicated in the table above.
  • As there are two pairs of coils in a stepper motor, to control it, you'll need to reverse the current direction in each such pair, which means you'll need two H-bridges. It seems like the job for the L293D microchip.

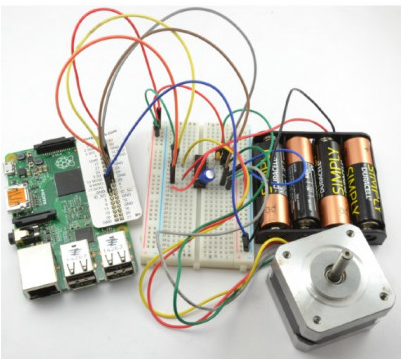
    That's correct - in this experiment, both for Arduino and Raspberry Pi, the control of a bipolar stepper motor is achieved using the L293D microchip, which is installed on the prototype board.
    Image

    Although the stepper motor used in the experiment has a nominal voltage of 12 V, it will work with a 6 V battery pack as well. The motor's torque will decrease, but it will still rotate effectively.

    DEFINITION OF STEPPER MOTOR PINOUT

    Every new stepper motor should have a technical datasheet as well as a label on its housing, indicating the purpose of each of its four pins. The key thing to know here is which pins form a pair connected to the same coil.

    To figure this out, there's a simple trick. Take any two wires and hold them between your thumb and index finger while turning the motor's shaft. If you feel resistance to rotation, then these two wires form a pair.

    Components

    For this experiment, you will need the following components to work with Arduino and Raspberry Pi:
    IC1 - L293D H-Bridge microchip
    C1 - 100nF capacitor
    C2 - 16V 100µF capacitor
    M1 - Bipolar stepper motor 12V
    4 AA battery compartment (6V)
    400-point solderless prototype board
    Jumper wires

    Construction

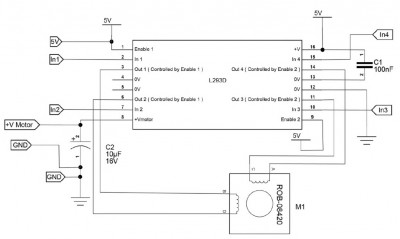
    The schematic diagram of this experiment is shown below. In this case, PWM is not used, so both Enable inputs of the L293D microchip are connected to a 5V power source to keep both H-bridges permanently enabled. The stepper motor is controlled by four channels: In1, In2, In3, and In4, to which control signals from Arduino or Raspberry Pi will be applied.
    Image

    Experimenting with Raspberry Pi

    Controlling a stepper motor using a Python program and Raspberry Pi is very similar to the Arduino version without using a library.

    To control the L293D chip, you'll need four GPIO pins on the Raspberry Pi.

    The Python program will prompt you to enter the delay between phases, direction, and the number of steps.

    Raspberry Pi Connection

    You can keep the prototype board used for Arduino and just replace the jumpers connecting to the Raspberry Pi, making sure to use "female-to-male" jumper wires, not "male-to-male" as with Arduino, as previously mentioned.

    Image

    Python Program

    The Python program version for controlling the stepper motor is nearly identical to the Arduino version without using libraries:

    Code: Select all

    import RPi.GPIO as GPIO
    import time
    
    GPIO.setmode(GPIO.BCM)
    
    in_1_pin = 23     # (1)
    in_2_pin = 24
    in_3_pin = 25
    in_4_pin = 18
    
    GPIO.setup(in_1_pin, GPIO.OUT)
    GPIO.setup(in_2_pin, GPIO.OUT)
    GPIO.setup(in_3_pin, GPIO.OUT)
    GPIO.setup(in_4_pin, GPIO.OUT)
    
    period = 0.02
    
    def step_forward(steps, period):    # (2)
      for i in range(0, steps):
        set_coils(1, 0, 0, 1)
        time.sleep(period)
        set_coils(1, 0, 1, 0)
        time.sleep(period)
        set_coils(0, 1, 1, 0)
        time.sleep(period)
        set_coils(0, 1, 0, 1)
        time.sleep(period)
    
    def step_reverse(steps, period):   
      for i in range(0, steps):
        set_coils(0, 1, 0, 1)
        time.sleep(period)
        set_coils(0, 1, 1, 0)
        time.sleep(period)
        set_coils(1, 0, 1, 0)
        time.sleep(period)
        set_coils(1, 0, 0, 1)
        time.sleep(period)
    
      
    def set_coils(in1, in2, in3, in4):     # (3)
      GPIO.output(in_1_pin, in1)
      GPIO.output(in_2_pin, in2)
      GPIO.output(in_3_pin, in3)
      GPIO.output(in_4_pin, in4)
      
    
    try:
        print('Command letter followed by number');
        print('p20 - set the inter-step period to 20ms (control speed)');
        print('f100 - forward 100 steps');
        print('r100 - reverse 100 steps');
        
        while True:      # (4)
            command = raw_input('Enter command: ')
            parameter_str = command[1:] # from char 1 to end
            parameter = int(parameter_str)     # (5)
            if command[0] == 'p':     # (6)
                period = parameter / 1000.0
            elif command[0] == 'f':
                step_forward(parameter, period)
            elif command[0] == 'r':
                step_reverse(parameter, period)
    
    finally:
        print('Cleaning up')
        GPIO.cleanup()
    Let's clarify some aspects of the program step by step, using the comments provided in the code:

    1. The program defines constants for the four control pins and sets them as outputs.

    2. The step_forward and step_reverse functions are almost identical to their Arduino equivalents. The four coils are switched in the required order when the set_coils function is called. It repeatedly performs steps with a delay between each coil switch.

    3. The set_coils function sets the four control pins according to its four parameters.

    4. In the main program loop, a command string is read using raw_input. The parameter following the letter is separated from the command letter using slicing [1:], which in Python means the string from position 1 (the second character) to the end of the string.

    5. The string variable is then converted to an integer using the built-in int function.

    6. A series of three expressions each performs a specific action depending on the command: it changes the value of the period variable, starts the motor in the forward or reverse direction.

    Uploading and Running the Program

    Run the program with the command: sudo python bi_stepper.py

    You will see a message prompting you to enter commands from the allowed list. They are exactly the same as in the case of Arduino:

    Code: Select all

    Command letter followed by number
    p20 - set the inter-step period to 20ms (control speed)
    f100-forward 100 steps
    r100-reverse 100 steps
    Enter command: p5
    Enter command: f50
    Enter command: p10 
    Enter command: r100
    Enter command:
    
  • Unipolar stepper motors operate almost the same way as bipolar motors but do not require H-bridges for control. This is due to their more complex coil structure. The diagram below illustrates the operation of a unipolar stepper motor.

    A unipolar motor has five coil leads, unlike the four leads of a bipolar motor. Four of these leads are equivalent to the leads of a bipolar motor, representing the coil ends A, B, C, and D. So, if desired, you can use the ends of coils A, B, C, and D and control them with H-bridges as if it were a bipolar motor, and everything will work fine.

    Image

    The fifth lead of a unipolar stepper motor connects to the midpoints of each coil's windings. By connecting this lead to the ground (GND), you can magnetize the coil's north pole when supplying power to lead A, or the south pole when supplying power to lead B. This eliminates the need for H-bridges.
  • The absence of a need for H-bridges to control unipolar stepper motors does not negate the fact that the motor coils consume too much current to be powered directly from the outputs of an Arduino or Raspberry Pi.

    An obvious way to increase the current is to use transistors, as demonstrated in the "Experiment: Motor Control" section. You will need four transistors, one for each of the leads A, B, C, and D. Additionally, current-limiting resistors will be required in the base circuit of these transistors, along with protective flyback diodes for each coil. The diagram below illustrates how to connect each coil of a unipolar motor, and you will need four such circuits for complete motor control.

    Image

    These circuits can be readily assembled on a prototyping board, but it will require quite a few jumpers.

    A more elegant solution is to use a specialized integrated circuit (IC), such as the ULN2803. This affordable IC contains eight individual Darlington transistor pairs in a single package. Moreover, it already includes base resistors and protective diodes. The only additional component required would be a capacitor in the power supply circuit.

    The ULN2803 IC (www.adafruit.com/datasheets/ULN2803A.pdf) can handle currents up to 500 mA in each channel at a maximum voltage of 50 V.

    In the upcoming section, "Experiment: Controlling a Unipolar Stepper Motor," we will utilize one of these devices to control a unipolar stepper motor from both Arduino and Raspberry Pi.
  • The image below illustrates a Raspberry Pi board controlling a unipolar stepper motor of one of its widely used types, equipped with a 1:16 reduction gearbox. Although the motor itself takes 32 steps per revolution, the presence of the reducer means that 513 phase transitions must be executed for one full revolution, equivalent to 128 steps per revolution.

    Image

    Equipment

    The diagram below shows the connection scheme of unipolar motor coils modified for use with the ULN2003 microchip. Note that there are still four unused composite transistors that can be used to control a second stepper motor. For stepper motors with higher operating currents, the transistors of the microchip can be paired by connecting two of their inputs and two corresponding outputs together.

    In this setup, a low-power motor with a 5 V power supply and a relatively low working current is used, making it possible to power it directly from a Raspberry Pi or Arduino. With two coils energized, the current consumption is approximately 150 mA. If a more powerful motor or one with a higher supply voltage is used, a separate power source will need to be connected, as was done with the bipolar stepper motor.

    Finding out which lead is connected to what inside the motor can be done in the same way as recommended for the bipolar motor. Additional complexity here arises from the presence of a common wire. Therefore, you should start by finding the common wire that resists rotation while being connected to any of the other leads. Then, to find the other wires, you can use the same method as for the bipolar motor.

    Image

    Components

    For this experiment, you will need the following components to work with Arduino and Raspberry Pi:

    IC1 - ULN2803 Microchip
    C2 - 16V 100uF Capacitor
    M1 - 5V Unipolar Stepper Motor
    4xAA Battery Holder (6V)
    400-Point Breadboard
    Jumper Wires

    Connecting the Raspberry Pi

    The diagram shows the wiring and connection of the Raspberry Pi to the ULN2803 chip
    Image

    Program for Raspberry Pi

    Code: Select all

    import RPi.GPIO as GPIO
    import time
    
    GPIO.setmode(GPIO.BCM)
    
    in_1_pin = 18
    in_2_pin = 24
    in_3_pin = 23
    in_4_pin = 25
    
    GPIO.setup(in_1_pin, GPIO.OUT)
    GPIO.setup(in_2_pin, GPIO.OUT)
    GPIO.setup(in_3_pin, GPIO.OUT)
    GPIO.setup(in_4_pin, GPIO.OUT)
    
    period = 0.02
    
    def step_forward(steps, period):  
      for i in range(0, steps):
        set_coils(1, 0, 0, 1)
        time.sleep(period)
        set_coils(1, 0, 1, 0)
        time.sleep(period)
        set_coils(0, 1, 1, 0)
        time.sleep(period)
        set_coils(0, 1, 0, 1)
        time.sleep(period)
    
    def step_reverse(steps, period):  
      for i in range(0, steps):
        set_coils(0, 1, 0, 1)
        time.sleep(period)
        set_coils(0, 1, 1, 0)
        time.sleep(period)
        set_coils(1, 0, 1, 0)
        time.sleep(period)
        set_coils(1, 0, 0, 1)
        time.sleep(period)
    
      
    def set_coils(in1, in2, in3, in4):
      GPIO.output(in_1_pin, in1)
      GPIO.output(in_2_pin, in2)
      GPIO.output(in_3_pin, in3)
      GPIO.output(in_4_pin, in4)
      
    
    try:
        print('Command letter followed by number');
        print('p20 - set the inter-step period to 20ms (control speed)');
        print('f100 - forward 100 steps');
        print('r100 - reverse 100 steps');
        
        while True:
            command = raw_input('Enter command: ')
            parameter_str = command[1:] # from char 1 to end
            parameter = int(parameter_str)
            if command[0] == 'p':
                period = parameter / 1000.0
            elif command[0] == 'f':
                step_forward(parameter, period)
            elif command[0] == 'r':
                step_reverse(parameter, period)
    
    finally:
        print('Cleaning up')
        GPIO.cleanup()
  • You may have noticed that the movement of a stepper motor is not always very smooth, even when the rotation speed is relatively high. For most applications, this is not a problem, but sometimes it would be better if the movement were smoother.

    Microstepping is a method that allows for smoother motor movement. Instead of simply turning the coils on and off, microstepping uses PWM (Pulse Width Modulation) to smoothly power the coils, resulting in smoother motor rotation.

    Microstepping can be implemented programmatically, but it's generally much easier to use specialized hardware designed for stepper motors capable of operating in microstepping mode. One such hardware solution is the EasyDriver board based on the A3967 microchip, developed by Brian Schmalz.

    A great tutorial on using the EasyDriver board with Arduino can be found online on Sparkfun's website, dedicated to this board (product ROB-12779). However, we won't repeat it here and will instead explore microstepping with Raspberry Pi in the following section.
  • In this experiment, we are using the EasyDriver board, which implements microstepping mode for a 12V stepper motor. This motor was previously used with Raspberry Pi in the section "Experiment: Controlling a Bipolar Stepper Motor."

    You can also use a unipolar stepper motor by not connecting the common wire; in this case, the unipolar motor will function like a bipolar one.

    The EasyDriver board comes with header pins, allowing you to connect it directly to a breadboard. The image below shows the final view of the assembled circuit.

    Image

    Components

    For this experiment with Raspberry Pi, you will need the following components:

    1. EasyDriver board for controlling stepper motors.
    2. 12V Bipolar stepper motor.
    3. 4 AA battery holder (6V).
    4. 400-point solderless breadboard.
    5. Jumper wires.

    Note:
    Most 12V stepper motors can operate properly even at 6V. However, it's still recommended to use a 12V power supply when possible.


    Connecting Raspberry Pi

    The diagram below illustrates the layout of the breadboard with the EasyDriver board and its connection to the Raspberry Pi.

    Image

    The EasyDriver board already includes capacitors that you would typically need to install manually in other cases. It also has a voltage regulator, providing power to the A3967 microchip. Therefore, there is no need to connect it to the power supply of the Raspberry Pi. All you need to do is connect the common wire (GND) and the four control signals (Control).

    Program

    As the name suggests, the EasyDriver board is straightforward to control programmatically. The basic commands to the board are sent using only two pins. When the step pin receives a HIGH pulse, the motor takes one step in the direction specified by the direction pin.

    The other two pins, ms1 and ms2, are used to set the microstepping resolution from 0 to 1/8.

    Here's the program code:

    Code: Select all

    import RPi.GPIO as GPIO
    import time
    
    GPIO.setmode(GPIO.BCM)
    
    step_pin = 24
    dir_pin = 25
    ms1_pin = 23
    ms2_pin = 18
    
    GPIO.setup(step_pin, GPIO.OUT)
    GPIO.setup(dir_pin, GPIO.OUT)
    GPIO.setup(ms1_pin, GPIO.OUT)
    GPIO.setup(ms2_pin, GPIO.OUT)
    
    period = 0.02
    
    def step(steps, direction, period):  # (1)
      GPIO.output(dir_pin, direction)  
      for i in range(0, steps):
        GPIO.output(step_pin, True)
        time.sleep(0.000002)
        GPIO.output(step_pin, False)
        time.sleep(period)
    
    def step_mode(mode):                 # (2)
        GPIO.output(ms1_pin, mode & 1)   # (3)
        GPIO.output(ms2_pin, mode & 2)
    
    try:
        print('Command letter followed by number');
        print('p20 - set the inter-step period to 20ms (control speed)');
        print('m - set stepping mode (0-none 1-half, 2-quater, 3-eighth)');
        print('f100 - forward 100 steps');
        print('r100 - reverse 100 steps');
        
        while True:                       # (4)
            command = raw_input('Enter command: ')
            parameter_str = command[1:] # from char 1 to end
            parameter = int(parameter_str)
            if command[0] == 'p':
                period = parameter / 1000.0
            elif command[0] == 'm':
                step_mode(parameter)
            elif command[0] == 'f':
                step(parameter, True, period)
            elif command[0] == 'r':
                step(parameter, False, period)
    
    finally:
        print('Cleaning up')
        GPIO.cleanup()
    NOTE
    You should already be familiar with the GPIO pinout and initialization code that launches most Python programs in this book. If you're not, please refer back to previous sections.


    Let's clarify some points of the program step by step using the annotations provided in the comments:

    1. The step function contains the code to move the motor by a number of steps (microsteps). It takes the number of steps, direction (0 or 1), and delay between each step as parameters. Inside the function, the dir_pin responsible for the direction on the EasyDriver board is first set, and then the required number of pulses is generated on the step_pin. Each pulse on the step_pin lasts only 2 microseconds (the technical specification of the A3967 chip specifies that pulse duration should be at least 1 microsecond).

    2. The step_mode function sets the state of the clock mode pins according to the selected mode value, which should be between 0 and 3.

    3. The code inside the step_mode function extracts two bits from the mode number and sets ms1_pin and ms2_pin using the logical AND (&) operator. The table shows the relationship between the microstepping mode pin states and the motor's behavior.

    Table. Microstepping Control Pins
    Image

    4. The main program loop is very similar to the Python program in the section "Experiment: Controlling a Bipolar Stepper Motor," with the addition of the "m" command, which allows you to set the microstepping mode.

    Running the Program

    Run the program and, in response to the prompt, enter the commands m0, p8, and then f800:
    $ sudo python filename
    Command letter followed by number
    p20 - set the inter-step period to 20ms (control speed)
    m - set stepping mode (0-none 1-half, 2-quarter, 3-eighth)
    f100 - forward 100 steps
    r100 - reverse 100 steps
    Enter command: m0
    Enter command: p8
    Enter command: f800


    This should rotate the motor shaft four times (for a 200-step motor). Try to notice the smoothness of the shaft movement during rotation.

    Then enter the following commands: m3, p1, f6400 - the motor shaft will make four revolutions at the same speed but much smoother.

    Please note that to maintain the same speed, the step period was reduced by a factor of 8, and the number of steps (in this case, microsteps) was increased by a factor of 8.
    Image
  • Brushless DC motors (BLDC) are small yet powerful motors commonly found in quadcopters and radio-controlled model airplanes. Despite their small size, they can generate much greater torque compared to traditional DC motors of the same weight. They are included in this chapter because they share many similarities with stepper motors, although they are formally categorized as DC motors.

    Image

    Unlike brushed DC motors, brushless DC motors do not have a mechanical commutator-collector that changes the current direction during motor rotation. In terms of construction, they are more similar to stepper motors, with the difference being that instead of two pairs of coils, they contain several sets of three coils. Based on this characteristic, they can be considered more like three-phase electric motors, and the drives for brushless motors are significantly more complex than traditional H-bridges. Indeed, each coil can conduct current in both forward and reverse directions and can also be in a "high-impedance," i.e., disconnected state. To efficiently control the motor, its control microchip (driver) must measure the voltage across the "disconnected" coil to adjust the switching time to the next phase of operation.

    Unfortunately, it is practically impossible to find brushless DC motor control chips that can be easily mounted on a prototype board. Therefore, it is better to look for ready-made driver boards.

    To obtain the power and dimensions of a brushless DC motor without the hassle of control boards, you can purchase a motor with a built-in controller and only two wires coming out of the casing. You can then connect it like a regular DC motor.