This is the second part of the series of articles about STM32F1xxx microcontrollers. Here we will talk about CMSIS library, why it is needed, where to get it and how to connect it to your project.
Introduction
The Cortex Microcontroller Software Interface Standard (CMSIS) contains a description of all microcontroller registers, a table of interrupt vectors, and some starting code that is executed before passing control to the main() function. Generally speaking, CMSIS is an optional component of the project, however, you will have to take care of a huge number of things yourself. In addition, this library allows you to write somewhat portable code from one microcontroller, to another.
Downloading CMSIS
At the moment CMSIS is supplied together with STM32Cube MCU Package. You can download it on the page of the selected microcontroller (where you downloaded datasheet, Reference manual and so on), it is called STM32CubeF1:

-
image.png (30 KiB)
Viewed 21304 times
You need to register on their site to download it. Why did they do that?:\ I'll leave the link to the archive at the end of the article, so as not to bother with all these registrations. But still it's better to download the actual version of the library on the official site. The archive weighs quite a lot, 97 meters.
Creating a project in IAR ARM
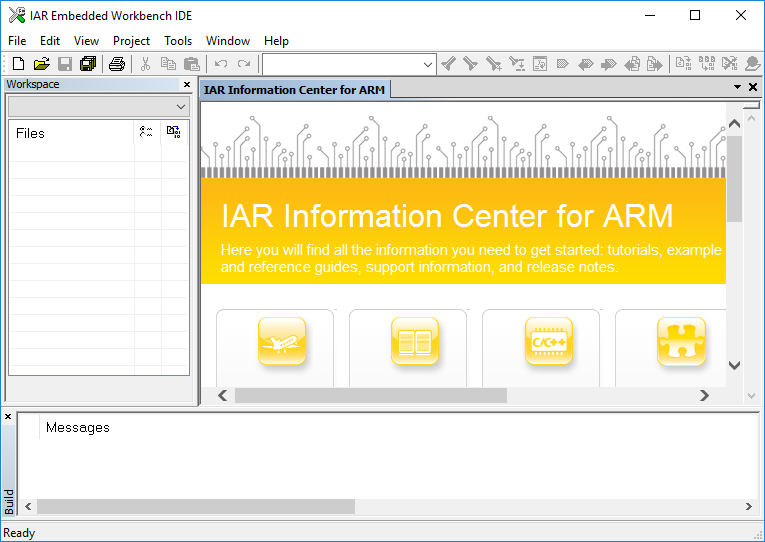
Now we do a little preparatory work to create a project in IAR ARM. Start IAR Embedded Workbench environment:
-
image.png (48.4 KiB)
Viewed 21304 times
In IAR-e all projects (Projects) are inside a Workspace, and the number of projects in one Workspace can be several.
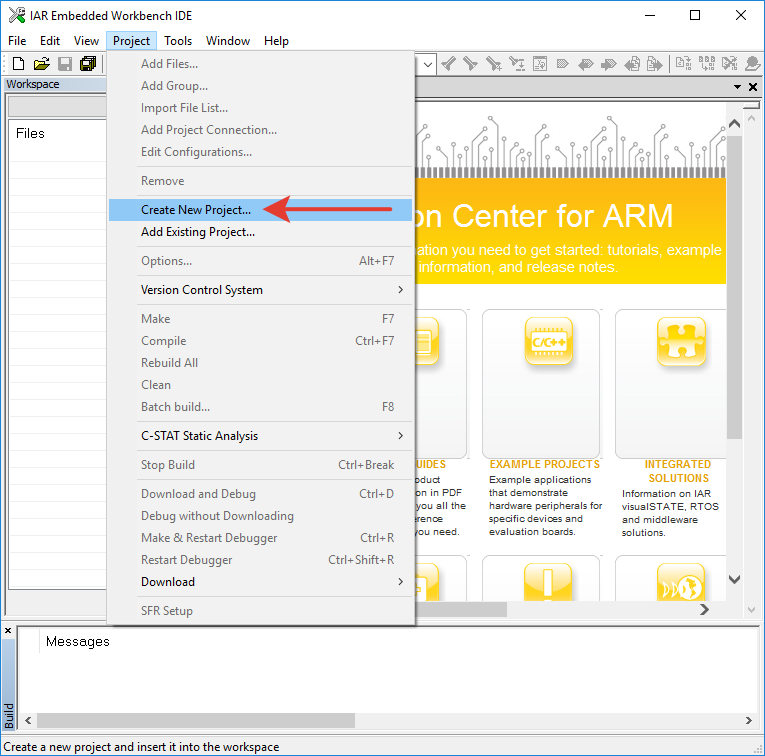
Choose
Project->Create New Project....
-
image.png (71.54 KiB)
Viewed 21304 times
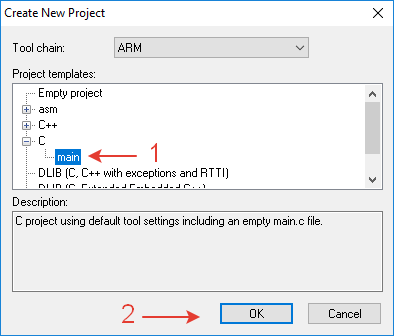
In the opened window select the project type:
C->main:
-
image.png (8.6 KiB)
Viewed 21304 times
Click OK, type some name (in my case
test_proj) and save in some folder.
The project is created. After that choose
File->Save All and in the opened window type the name of our Workspace, it can be named the same way as the project.
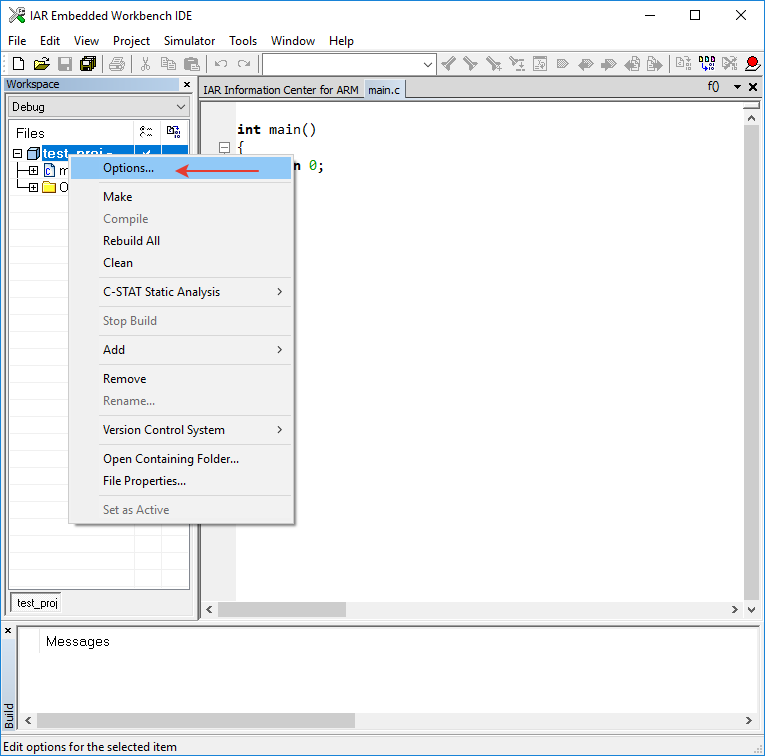
Now we need to customize the project for a specific microcontroller, namely
STM32F103C8. Right-click on the name of our project and select
Options... item.
-
image.png (34.31 KiB)
Viewed 21304 times
In the
General Options section on the Target tab, select our microcontroller:
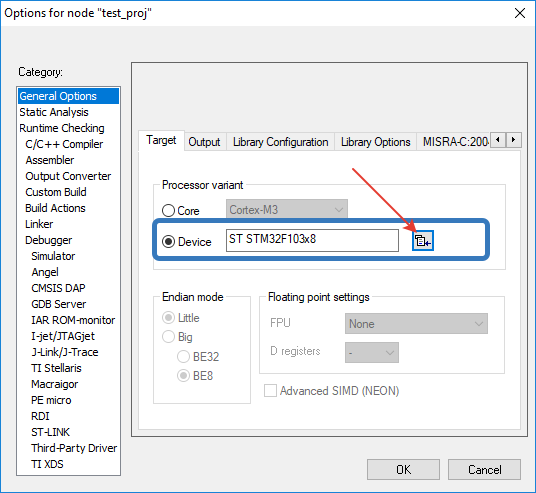
-
image.png (25.65 KiB)
Viewed 21304 times
Next, we insist on the compilation optimization level. When debugging, I sometimes encountered some problems with high optimization level, so I advise you to set None or at least Low on the Optimizations tab in C/C++ Compiler:
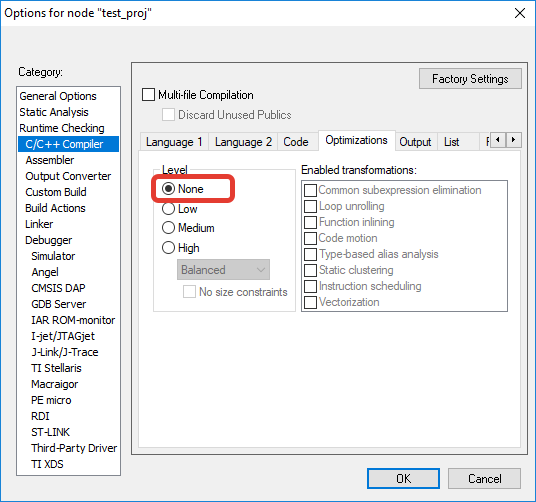
-
image.png (25.88 KiB)
Viewed 21304 times
Putting all source files in the root of the project is not a good idea, in the future it will be difficult to navigate among the pile of files, so for
CMSIS we will create a folder with the same name
CMSIS . But we need to specify to the compiler the path where to look for the sources. To do this, on the
Preprocessor tab we need to specify the path to the folder with the library. In order not to specify absolute paths, IAR has a variable $PROJ_DIR$, which stores the path to the folder with the project:
The first line points to the root of the project, where main.c is located, it's kind of unnecessary, but let it be, the second line points to the future folder with CMSIS. Pay attention to the tab scroll arrows, highlighted in blue:
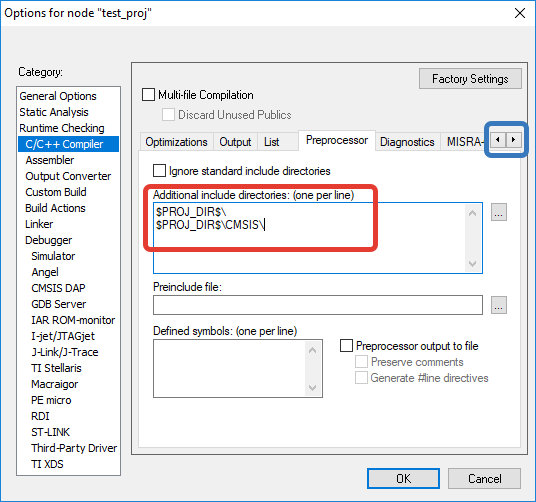
-
image.png (26.23 KiB)
Viewed 21304 times
Now the debugger. In the
Debugger section of the Setup tab select
ST-LINK, which is included with the
Discovery debugging boards:
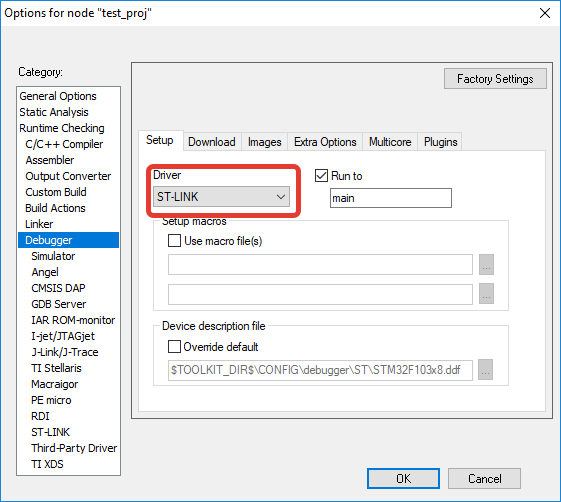
-
image.png (23.32 KiB)
Viewed 21304 times
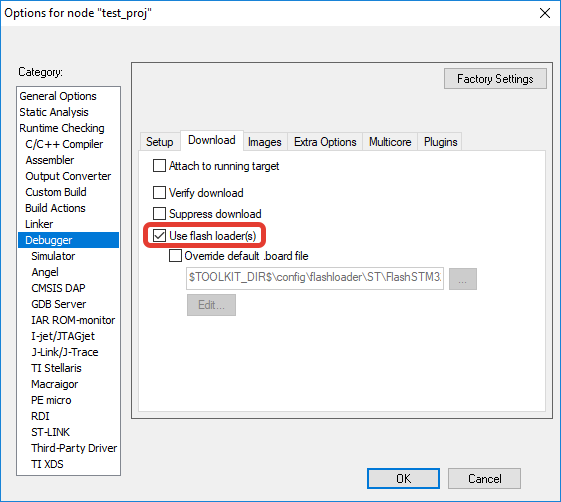
and on the Download tab check the Use flash loader(s) checkbox:
-
image.png (22.95 KiB)
Viewed 21304 times
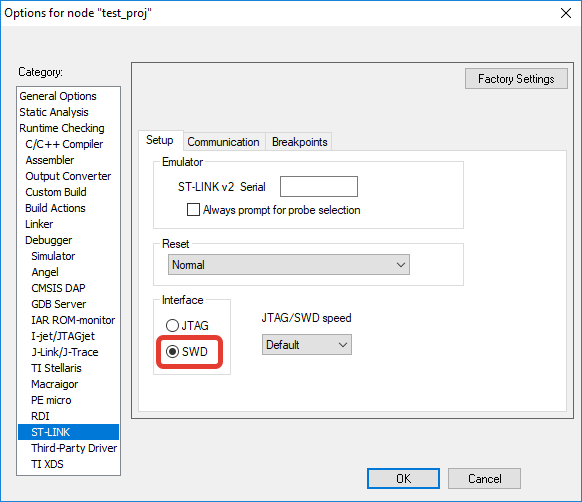
After that in the
ST-LINK section select the type of connection interface, we have
SWD:
-
image.png (22.84 KiB)
Viewed 21304 times
Phew, the project is set up. Click OK to save the changes.
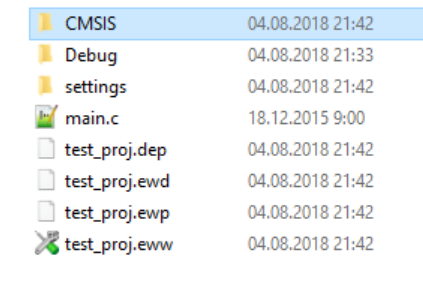
After that we go to the project directory and create a
CMSIS folder, where we will put the CMSIS library files:
-
image.png (62.65 KiB)
Viewed 21304 times
CMSIS library
The archive with STM32CubeF1 has been downloaded and unzipped. It contains many different things: documentation, examples for debug boards, HAL drivers and CMSIS itself, which we need. CMSIS is located in .\STM32Cube_FW_F1_V1.6.0\Drivers\CMSIS.
First go to .\CMSIS/Device\ST/STM32F1xx/Include:
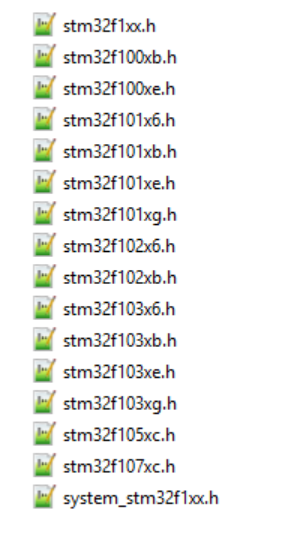
-
image.png (80.61 KiB)
Viewed 21304 times
We have a lot of .h files for different microcontrollers here, but we don't see anything like stm32f103x8.h. Let's open stm32f1xx.h. There is a thing like this there:
Code: Select all
#if !defined (STM32F100xB) && !defined (STM32F100xE) && !defined (STM32F101x6) && \
    !defined (STM32F101xB) && !defined (STM32F101xE) && !defined (STM32F101xG) && !defined (STM32F102x6) && !defined (STM32F102xB) && !defined (STM32F103x6) && \
    !defined (STM32F103xB) && !defined (STM32F103xE) && !defined (STM32F103xG) && !defined (STM32F105xC) && !defined (STM32F107xC)
  /* #define STM32F100xB  */   /*!< STM32F100C4, STM32F100R4, STM32F100C6, STM32F100R6, STM32F100C8, STM32F100R8, STM32F100V8, STM32F100CB, STM32F100RB and STM32F100VB */
  /* #define STM32F100xE */    /*!< STM32F100RC, STM32F100VC, STM32F100ZC, STM32F100RD, STM32F100VD, STM32F100ZD, STM32F100RE, STM32F100VE and STM32F100ZE */
  /* #define STM32F101x6  */   /*!< STM32F101C4, STM32F101R4, STM32F101T4, STM32F101C6, STM32F101R6 and STM32F101T6 Devices */
  /* #define STM32F101xB  */   /*!< STM32F101C8, STM32F101R8, STM32F101T8, STM32F101V8, STM32F101CB, STM32F101RB, STM32F101TB and STM32F101VB */
  /* #define STM32F101xE */    /*!< STM32F101RC, STM32F101VC, STM32F101ZC, STM32F101RD, STM32F101VD, STM32F101ZD, STM32F101RE, STM32F101VE and STM32F101ZE */
  /* #define STM32F101xG  */   /*!< STM32F101RF, STM32F101VF, STM32F101ZF, STM32F101RG, STM32F101VG and STM32F101ZG */
  /* #define STM32F102x6 */    /*!< STM32F102C4, STM32F102R4, STM32F102C6 and STM32F102R6 */
  /* #define STM32F102xB  */   /*!< STM32F102C8, STM32F102R8, STM32F102CB and STM32F102RB */
  /* #define STM32F103x6  */   /*!< STM32F103C4, STM32F103R4, STM32F103T4, STM32F103C6, STM32F103R6 and STM32F103T6 */
  /* #define STM32F103xB  */   /*!< STM32F103C8, STM32F103R8, STM32F103T8, STM32F103V8, STM32F103CB, STM32F103RB, STM32F103TB and STM32F103VB */
  /* #define STM32F103xE */    /*!< STM32F103RC, STM32F103VC, STM32F103ZC, STM32F103RD, STM32F103VD, STM32F103ZD, STM32F103RE, STM32F103VE and STM32F103ZE */
  /* #define STM32F103xG  */   /*!< STM32F103RF, STM32F103VF, STM32F103ZF, STM32F103RG, STM32F103VG and STM32F103ZG */
  /* #define STM32F105xC */    /*!< STM32F105R8, STM32F105V8, STM32F105RB, STM32F105VB, STM32F105RC and STM32F105VC */
  /* #define STM32F107xC  */   /*!< STM32F107RB, STM32F107VB, STM32F107RC and STM32F107VC */
#endif
Pay attention to the line:
Code: Select all
/* #define STM32F103xB */ /*!< STM32F103C8, STM32F103R8, STM32F103T8, STM32F103V8, STM32F103CB, STM32F103RB, STM32F103TB and STM32F103VB */
Aha, STM32F103C8 is here. So for our microcontroller will fit the sources from the B version: STM32
F103xB. Let's remember this. From this folder copy the following files to CMSIS of the project:
Code: Select all
stm32f1xx.h
stm32f103xb.h
system_stm32f1xx.h
Then go to .
\CMSIS\Device\ST\STM32F1xx\Source\Templates and take the file
system_stm32f1xx.c from here.
After that we need the startup file. Go to .
\CMSIS\Device\ST\STM32F1xx\Source\Templates\iar. There is also a lot of files waiting for us and we are also looking for the one ending with xB:
startup_stm32f103xb.s. Copy it to
$PROJ_DIR$\CMSIS\.
Then go to .\CMSIS\Include and take these 3 files:
core_cm3.h
core_cmFunc.h
core_cmInstr.h
Since in STM32F103C8 microprocessor core Cortex M3, we take the corresponding sources.
Total 8 files:
- stm32f1xx.h
This is how it should look like in the $PROJ_DIR$\CMSIS folder:
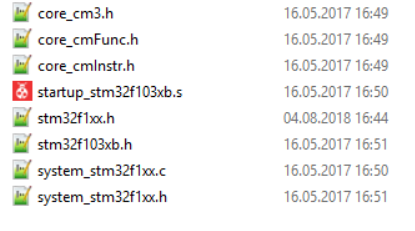
-
image.png (54.87 KiB)
Viewed 21304 times
Now these files should be added to the project browser in IAR. For convenience, let's create a group with the same name CMSIS. Right-click on the project name and select
Add->Add Group.....
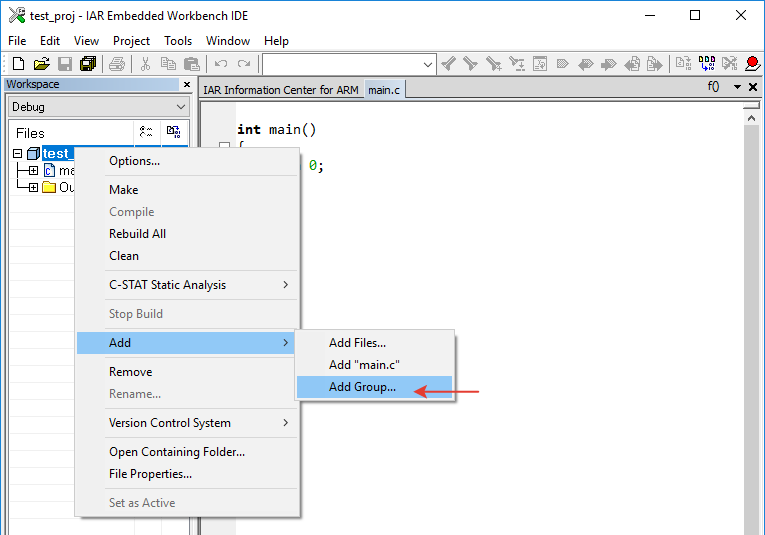
-
image.png (30.02 KiB)
Viewed 21304 times
Enter the name of the group and click OK:
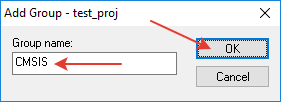
-
image.png (3.15 KiB)
Viewed 21304 times
Then add the files from the CMSIS folder to the CMSIS group:
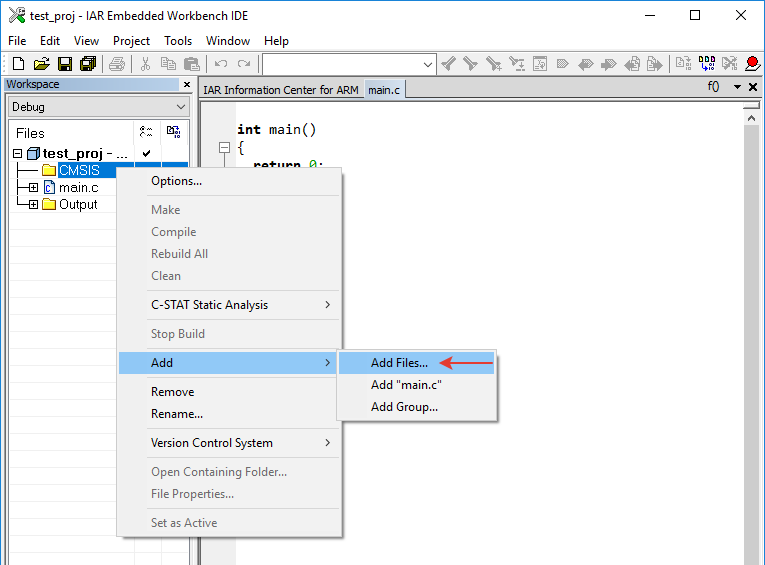
-
image.png (31.53 KiB)
Viewed 21304 times
In the dialog box that opens, select all files and click
Open
The result is this:
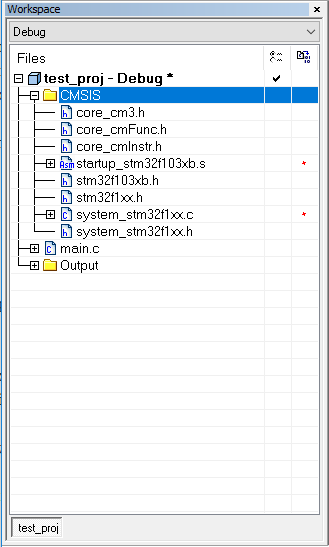
-
image.png (13.78 KiB)
Viewed 21304 times
After that, open the file stm32f1xx.h and uncomment the stack with #define STM32F103xB:
Code: Select all
#if !defined (STM32F100xB) && !defined (STM32F100xE) && !defined (STM32F101x6) && \
    !defined (STM32F101xB) && !defined (STM32F101xE) && !defined (STM32F101xG) && !defined (STM32F102x6) && !defined (STM32F102xB) && !defined (STM32F103x6) && \
    !defined (STM32F103xB) && !defined (STM32F103xE) && !defined (STM32F103xG) && !defined (STM32F105xC) && !defined (STM32F107xC)
  /* #define STM32F100xB  */   /*!< STM32F100C4, STM32F100R4, STM32F100C6, STM32F100R6, STM32F100C8, STM32F100R8, STM32F100V8, STM32F100CB, STM32F100RB and STM32F100VB */
  /* #define STM32F100xE */    /*!< STM32F100RC, STM32F100VC, STM32F100ZC, STM32F100RD, STM32F100VD, STM32F100ZD, STM32F100RE, STM32F100VE and STM32F100ZE */
  /* #define STM32F101x6  */   /*!< STM32F101C4, STM32F101R4, STM32F101T4, STM32F101C6, STM32F101R6 and STM32F101T6 Devices */
  /* #define STM32F101xB  */   /*!< STM32F101C8, STM32F101R8, STM32F101T8, STM32F101V8, STM32F101CB, STM32F101RB, STM32F101TB and STM32F101VB */
  /* #define STM32F101xE */    /*!< STM32F101RC, STM32F101VC, STM32F101ZC, STM32F101RD, STM32F101VD, STM32F101ZD, STM32F101RE, STM32F101VE and STM32F101ZE */
  /* #define STM32F101xG  */   /*!< STM32F101RF, STM32F101VF, STM32F101ZF, STM32F101RG, STM32F101VG and STM32F101ZG */
  /* #define STM32F102x6 */    /*!< STM32F102C4, STM32F102R4, STM32F102C6 and STM32F102R6 */
  /* #define STM32F102xB  */   /*!< STM32F102C8, STM32F102R8, STM32F102CB and STM32F102RB */
  /* #define STM32F103x6  */   /*!< STM32F103C4, STM32F103R4, STM32F103T4, STM32F103C6, STM32F103R6 and STM32F103T6 */
#define STM32F103xB     /*!< STM32F103C8, STM32F103R8, STM32F103T8, STM32F103V8, STM32F103CB, STM32F103RB, STM32F103TB and STM32F103VB */
  /* #define STM32F103xE */    /*!< STM32F103RC, STM32F103VC, STM32F103ZC, STM32F103RD, STM32F103VD, STM32F103ZD, STM32F103RE, STM32F103VE and STM32F103ZE */
  /* #define STM32F103xG  */   /*!< STM32F103RF, STM32F103VF, STM32F103ZF, STM32F103RG, STM32F103VG and STM32F103ZG */
  /* #define STM32F105xC */    /*!< STM32F105R8, STM32F105V8, STM32F105RB, STM32F105VB, STM32F105RC and STM32F105VC */
  /* #define STM32F107xC  */   /*!< STM32F107RB, STM32F107VB, STM32F107RC and STM32F107VC */
#endif
Next, we write the following main:
Code: Select all
#include "stm32f1xx.h"

int main()
{
  return 0;
}
Choose
Project->Make. If you have done everything correctly, you will get a message about successful compilation of the project:
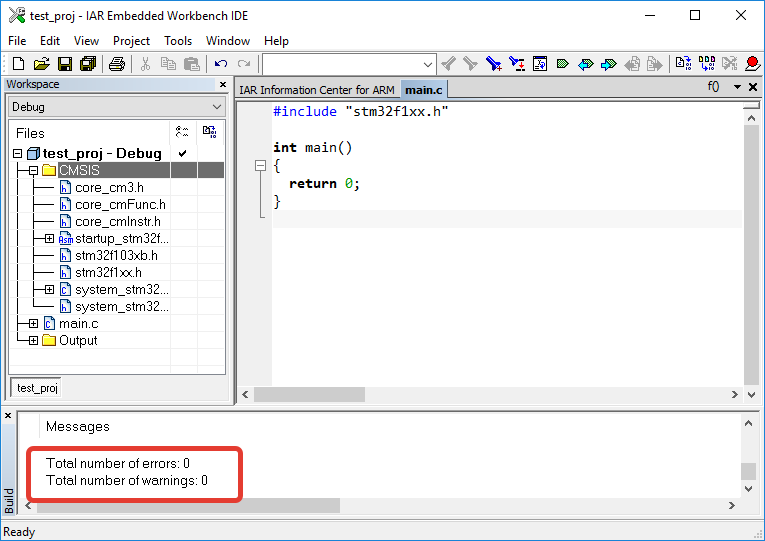
-
image.png (31.22 KiB)
Viewed 21304 times
Here we have learned how to connect CMSIS to our project. In the next article we will continue studying STM32 microcontrollers
