WAV audio files can be played on Arduino using the hardware described in the "
Experiment: Loudspeaker Without an Amplifier on Arduino" section and the Arduino library called
PCM (Pulse Code Modulation). This library employs a technology somewhat akin to Pulse Width Modulation (PWM) to generate vibrations capable of producing sound.
The Arduino's flash memory allows for approximately 4 seconds of recording. If you need to play longer audio clips, you'll need to add an SD card reader to the Arduino and follow the recommendations provided on the Arduino website at [
https://www.arduino.cc/en/Tutorial/SimpleAudioPlayer](
https://www.arduino.cc/en/Tutorial/SimpleAudioPlayer).
We will record the sound on a computer using the Audacity software package, and then run a utility that converts the audio file into a series of numbers corresponding to the sound. This data can then be inserted into an Arduino program for playback.
The original article describing this approach to sound playback can be found on the High-Low Tech website ([
http://highlowtech.org/?p=1963](
http://highlowtech.org/?p=1963)). Our experiment differs slightly from this description as we use the freely available Audacity application for audio recording.
Hardware and Software
In this experiment, you will use the same hardware as described in the "
Experiment: Loudspeaker Without an Amplifier on Arduino" section. However, you will need to install the following software on your computer to record and process audio clips:
- Audacity application: [audacityteam.org](
https://www.audacityteam.org/).
- Audio Encoder utility - you can find a link to the version for your operating system on the website [highlowtech.org/?p=1963](
http://highlowtech.org/?p=1963).
Creating an Audio File
Note: If you don't wish to record your own audio clip, you can skip ahead to the "Uploading and Running the Program" section included in this experiment, which contains a pre-encoded small audio block.
To create an audio file, launch the Audacity program, set the recording mode to mono and select a project rate of 8000 Hz.
Click the red "Record" button to start recording, and record your message. Note that the recording should not exceed one second. Once the recording is completed, you will see a waveform image in the Audacity window. You can select any "silent" portion at the beginning or end of the recording and delete it, leaving only the desired part of the audio block.
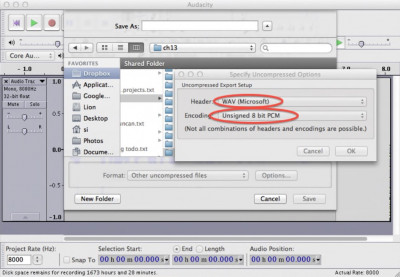
The recorded sound needs to be exported to the correct format, and this requires specific settings. Choose "File" from the menu, then select "Export Audio." In the drop-down menu, choose "Other uncompressed files," go to the "Format options" section, and set the format to "WAV (Microsoft)" and "Unsigned 8-bit PCM" as shown in the image below. Give the file a name and skip the page prompting you for artist information.

-
image.png (132.19 KiB)
Audacity program selection of export parameters Viewed 21790 times
The file you've just generated is in binary format. It needs to be converted into a list of comma-separated numbers in text form so that it can be inserted into our program. To do this, run the Audio Encoder utility downloaded from the website [highlowtech.org](
http://highlowtech.org). It will prompt you to select the file for conversion - choose the file that was just exported from Audacity.
After a few seconds, a dialog will appear, confirming that all the data is in your clipboard. Open the /arduino/experiments/wav_arduino program and replace the entire line starting with the sequence
125, 119, 115, with the data from your clipboard. This is a very long line, so it's best to select it by placing the cursor at the beginning of the line and, while holding the
Shift key, move the cursor down to the end of the line. To replace the selected text with the data from the clipboard, use the "Insert" option from the context menu. If you were to graph all the inserted numbers, the shape would resemble what you saw in Audacity when recording the audio clip.
Arduino Program
Before compiling and running the program, you need to install the PCM library. Download the ZIP archive from GitHub (
https://github.com/damellis/PCM/zipball/master), unzip it, rename the folder to "PCM," and move it to your Arduino libraries directory.
The Arduino program (excluding the sound data) has a very modest size, but the data array is represented by a very long line!
Code: Select all
#include <PCM.h>

const unsigned char sample[] PROGMEM = {125, 119, 115, 115, 112, 116, 114, 113, 124, 126, 136, 145, 139}; //1

void setup() {
  startPlayback(sample, sizeof(sample)); //2
}

void loop() { //3
}
Let's clarify some points about this sketch using the line markup provided in the comments:
1. The data is stored in an array of type `
unsigned char`, consisting of eight-bit unsigned numbers. The `
PROGMEM` command ensures that the data is stored in the Arduino's flash memory (which should have approximately 32 KB available).
2. Sound playback of the sample is accomplished using the PCM library. The `
startPlayback` function is given the array of data to be played and the size of the data in bytes.
3. The sound clip is played once each time the Arduino is restarted, so the `loop` function remains empty.
Uploading and Running the Program
Upload the program to your Arduino, and as soon as the upload is complete, the sound clip will be played!
Right after uploading the program, in the bottom part of the Arduino IDE, you'll see a message showing how much of the Arduino's flash memory was used, roughly similar to the following:
"Binary sketch size: 11,596 bytes (of a 32,256 byte maximum)." If the sound file is too large, you'll receive an error message.