As there are two pairs of coils in a stepper motor, to control it, you'll need to reverse the current direction in each such pair, which means you'll need two H-bridges. It seems like the job for the L293D microchip.
That's correct - in this experiment, both for Arduino and Raspberry Pi, the control of a bipolar stepper motor is achieved using the L293D microchip, which is installed on the prototype board.

Although the stepper motor used in the experiment has a nominal voltage of 12 V, it will work with a 6 V battery pack as well. The motor's torque will decrease, but it will still rotate effectively.
DEFINITION OF STEPPER MOTOR PINOUT
Every new stepper motor should have a technical datasheet as well as a label on its housing, indicating the purpose of each of its four pins. The key thing to know here is which pins form a pair connected to the same coil.
To figure this out, there's a simple trick. Take any two wires and hold them between your thumb and index finger while turning the motor's shaft. If you feel resistance to rotation, then these two wires form a pair.
Components
For this experiment, you will need the following components to work with Arduino and Raspberry Pi:
IC1 - L293D H-Bridge microchip
C1 - 100nF capacitor
C2 - 16V 100µF capacitor
M1 - Bipolar stepper motor 12V
4 AA battery compartment (6V)
400-point solderless prototype board
Jumper wires
Construction
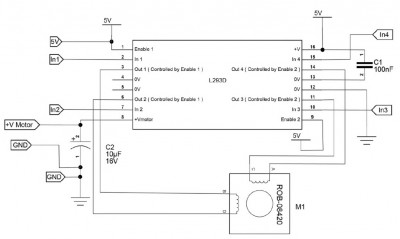
The schematic diagram of this experiment is shown below. In this case, PWM is not used, so both Enable inputs of the L293D microchip are connected to a 5V power source to keep both H-bridges permanently enabled. The stepper motor is controlled by four channels: In1, In2, In3, and In4, to which control signals from Arduino or Raspberry Pi will be applied.
 Experimenting with Raspberry Pi
Controlling a stepper motor using a Python program and Raspberry Pi is very similar to the Arduino version without using a library.
To control the L293D chip, you'll need four GPIO pins on the Raspberry Pi.
The Python program will prompt you to enter the delay between phases, direction, and the number of steps.
Raspberry Pi Connection
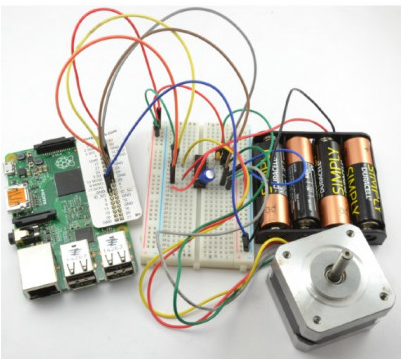
You can keep the prototype board used for Arduino and just replace the jumpers connecting to the Raspberry Pi, making sure to use "female-to-male" jumper wires, not "male-to-male" as with Arduino, as previously mentioned.
 Python Program
The Python program version for controlling the stepper motor is nearly identical to the Arduino version without using libraries:
Code: Select all
import RPi.GPIO as GPIO
import time

GPIO.setmode(GPIO.BCM)

in_1_pin = 23     # (1)
in_2_pin = 24
in_3_pin = 25
in_4_pin = 18

GPIO.setup(in_1_pin, GPIO.OUT)
GPIO.setup(in_2_pin, GPIO.OUT)
GPIO.setup(in_3_pin, GPIO.OUT)
GPIO.setup(in_4_pin, GPIO.OUT)

period = 0.02

def step_forward(steps, period):    # (2)
  for i in range(0, steps):
    set_coils(1, 0, 0, 1)
    time.sleep(period)
    set_coils(1, 0, 1, 0)
    time.sleep(period)
    set_coils(0, 1, 1, 0)
    time.sleep(period)
    set_coils(0, 1, 0, 1)
    time.sleep(period)

def step_reverse(steps, period):
  for i in range(0, steps):
    set_coils(0, 1, 0, 1)
    time.sleep(period)
    set_coils(0, 1, 1, 0)
    time.sleep(period)
    set_coils(1, 0, 1, 0)
    time.sleep(period)
    set_coils(1, 0, 0, 1)
    time.sleep(period)


def set_coils(in1, in2, in3, in4):     # (3)
  GPIO.output(in_1_pin, in1)
  GPIO.output(in_2_pin, in2)
  GPIO.output(in_3_pin, in3)
  GPIO.output(in_4_pin, in4)


try:
    print('Command letter followed by number');
    print('p20 - set the inter-step period to 20ms (control speed)');
    print('f100 - forward 100 steps');
    print('r100 - reverse 100 steps');

    while True:      # (4)
        command = raw_input('Enter command: ')
        parameter_str = command[1:] # from char 1 to end
        parameter = int(parameter_str)     # (5)
        if command[0] == 'p':     # (6)
            period = parameter / 1000.0
        elif command[0] == 'f':
            step_forward(parameter, period)
        elif command[0] == 'r':
            step_reverse(parameter, period)

finally:
    print('Cleaning up')
    GPIO.cleanup()
Let's clarify some aspects of the program step by step, using the comments provided in the code:
1. The program defines constants for the four control pins and sets them as outputs.
2. The
step_forward and
step_reverse functions are almost identical to their Arduino equivalents. The four coils are switched in the required order when the
set_coils function is called. It repeatedly performs steps with a delay between each coil switch.
3. The
set_coils function sets the four control pins according to its four parameters.
4. In the main program loop, a command string is read using
raw_input. The parameter following the letter is separated from the command letter using slicing [1:], which in Python means the string from position 1 (the second character) to the end of the string.
5. The string variable is then converted to an integer using the built-in
int function.
6. A series of three expressions each performs a specific action depending on the command: it changes the value of the
period variable, starts the motor in the forward or reverse direction.
Uploading and Running the Program
Run the program with the command:
sudo python bi_stepper.py
You will see a message prompting you to enter commands from the allowed list. They are exactly the same as in the case of Arduino:
Code: Select all
Command letter followed by number
p20 - set the inter-step period to 20ms (control speed)
f100-forward 100 steps
r100-reverse 100 steps
Enter command: p5
Enter command: f50
Enter command: p10
Enter command: r100
Enter command:
