Heating and cooling
-
This section covers devices for generating heat and cold, such as resistive heating elements and Peltier devices. The main focus here is on the construction of heaters and coolers. Information on how these heaters and coolers can be used in conjunction with Arduino and Raspberry Pi for precise temperature control will be discussed in the "Control Loops" section.
As we discussed earlier, a resistor generates heat by resisting the flow of current. As you may recall, the amount of heat generated in watts is equal to the product of the current passing through the resistor in amperes and the voltage drop across the resistor in volts.
The procedure for turning an electric motor on and off is quite familiar to you. Similarly, power is supplied to the resistor and taken from it. Any of the previous experiments involving turning the motor on and off can be easily replicated by replacing the motor with a resistor. Even pulse-width modulation (PWM) for power control will work well with a resistive heater. Therefore, for this experiment, you can do without Arduino and Raspberry Pi, simply using a battery pack and a resistor.
Please note that in this experiment, the resistor is used as a heating element, and the battery pack serves as the power source. Neither of these is a practical solution for heating even a very small device. Nevertheless, such a choice is convenient for conducting experiments.
Components
For this experiment, you will need the following components:
- 100-ohm, 0.25-watt resistor
- Thermometer
- 400-point breadboard
- 4xAA battery holder (6V)
Experiment Setup
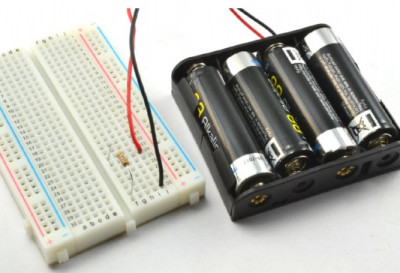
To conduct the experiment, simply connect the resistor to the terminals of the battery power source. The breadboard is only needed to secure the position of the resistor, as shown in the diagram below.
However, do not connect the battery yet, as the resistor will immediately start heating up.
Conducting the Experiment
Connect the battery, and with the help of a thermometer, observe how quickly the resistor heats up. The temperature of the resistor can reach up to 75°C. Be cautious - this is hot enough to burn your finger!
The resistance of the 100-ohm resistor and the circuit's voltage of 6V allow you to calculate the current using the formula:
I = V / R = 6 / 100 = 0.06 A
The power dissipated across the resistor is equal to the current multiplied by the voltage:
6 x 0.06 = 0.36 watts or 360 milliwatts (mW). This is slightly higher than the power the resistor can safely dissipate for extended periods (250 mW). Therefore, if operated in this mode for an extended period, it may quickly fail.
Please note that in this experiment, the resistor is used as a heating element, and the battery pack serves as the power source. Neither of these is a practical solution for heating even a very small device. Nevertheless, such a choice is convenient for conducting experiments.
Components
For this experiment, you will need the following components:
- 100-ohm, 0.25-watt resistor
- Thermometer
- 400-point breadboard
- 4xAA battery holder (6V)
Experiment Setup
To conduct the experiment, simply connect the resistor to the terminals of the battery power source. The breadboard is only needed to secure the position of the resistor, as shown in the diagram below.
However, do not connect the battery yet, as the resistor will immediately start heating up.
Conducting the Experiment
Connect the battery, and with the help of a thermometer, observe how quickly the resistor heats up. The temperature of the resistor can reach up to 75°C. Be cautious - this is hot enough to burn your finger!
The resistance of the 100-ohm resistor and the circuit's voltage of 6V allow you to calculate the current using the formula:
I = V / R = 6 / 100 = 0.06 A
The power dissipated across the resistor is equal to the current multiplied by the voltage:
6 x 0.06 = 0.36 watts or 360 milliwatts (mW). This is slightly higher than the power the resistor can safely dissipate for extended periods (250 mW). Therefore, if operated in this mode for an extended period, it may quickly fail.
In practical terms, resistors are not the best choice as heaters. If you need to heat something, you should use specialized heating elements (heaters). Heating elements, essentially, are large resistors made from materials specifically designed for heating and transferring heat to the object you intend to heat.
Heating, typically, requires more energy than generating light, sound, or even motion. Therefore, heating elements in electric kettles, household washing machines, and other devices that heat water are powered by high-voltage alternating current directly from the electrical grid simply because they need sufficient power to do their job.
The power rating of heating elements is measured in watts (W) or kilowatts (kW) (thousands of watts) just like the nominal power of resistors. They are essentially the same thing. The nominal power of a resistor is the amount of thermal energy it can generate per second without getting too hot and failing.
Previously, in the section "Experiment: Heating a Resistor," to calculate power, we used Ohm's law and the power formula (P = I x U). Combining these expressions, we get a simple and convenient formula, which, knowing the resistance of the heating element and the voltage across its terminals, can be used to calculate its power:
P = (U^2) / R
In other words, the thermal power generated by the heating element is equal to the square of the voltage in volts divided by the resistance in ohms. This formula applies to both direct and alternating current.
For example, a resistor (or heating element) with a resistance of 10 ohms at a voltage of 12 V will generate (12 x 12) / 10 = 14.4 W of thermal power. If you take an alternating voltage of 120 V, the power will be (120 x 120) / 10 = 1440 W or 1.44 kW.
So, for any heating element, you can determine a couple of parameters:
- Its operating voltage (12 V, 120 V, 220 V).
- Its power (50 W, 1 kW, 5 kW).
If a heating element is designed to heat water, it should be immersed in water that will carry away heat from it. Without water, it will quickly overheat and burn out.
At the household level, the terms power and energy are often used interchangeably. However, from a scientific standpoint, the concepts of power and energy are as distinct as velocity and distance.
In reality, power is the rate of transfer or conversion of energy. The power of a heating element is the amount of energy released as heat per second.
The unit of measurement for energy is the joule, and the watt, the unit of power, is a change in energy per joule per second.
From Power to Temperature Increase
If you know the power of a heating element and the substance it's heating, you can calculate how long it will take for the temperature of that substance to increase by a certain amount.
In the scientific world, these calculations are typically done using international units of measurement: watts, degrees Celsius, grams, and seconds. The results can always be converted into units that are more familiar to you.
Substances have a property called specific heat capacity (C), which is the amount of energy required to raise one gram of the substance by one degree Celsius. For example, water has a specific heat capacity of 4.2 J/(g·°C). In other words, it takes 4.2 joules of energy to raise 1 gram of water by 1 degree Celsius. If you want to heat 100 grams of water by 1°C, you'll need 420 joules of energy, and to heat the same 100 grams by 10°C, you'll need 4200 joules of energy.
The specific heat capacity of air is about 1 J/(g·°C), and for glass, it's 0.8 J/(g·°C). All substances are different.
Boiling Water
As an example, let's calculate how much time it would take for our small resistor to boil a certain amount of water.
Suppose we want to boil a glass of water (approximately 250 g). Let's also assume that the water starts at room temperature (20°C) and will boil at 100°C, meaning the water's temperature needs to increase by 80°C.
The total amount of energy required to heat 250 g of water by 80°C would be:
4.2 x 250 x 80 = 84,000 joules
In the section "Experiment: Heating a Resistor," our resistor generated 0.36 W of thermal power, which is equivalent to 0.36 joules per second. Therefore, it would take 84,000 / 0.36 = 233,333 seconds for it to heat the glass of water, which is approximately 64 hours!
However, for practical reasons explained in the next section, our resistor would never be able to boil the glass of water.
HEAT LOSSES AND THERMAL EQUILIBRIUM
It's essential to ensure that your heating (or cooling) element has enough power to perform the desired task.
The reason you can never boil a glass of water with a 0.4 W resistor is heat loss. If the water were in an ideally thermally insulated container, preventing heat from escaping, then yes, the water would get hotter and hotter until it boiled.
Heat loss is proportional to the temperature difference between the heated object and its surroundings. The hotter the water, the faster heat escapes. Thus, a balance is reached, and the temperature stabilizes when the water loses the same amount of heat (in watts) that the heating element adds. That's why the temperature of the resistor in the section "Experiment: Heating a Resistor" reaches approximately 75°C and stays there.
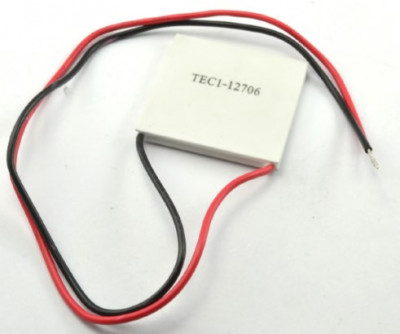
Peltier Elements (see figure below) possess a highly useful property where passing current through them causes one side of the element to become hotter while the other side becomes colder.
To make this happen, the current flowing through it needs to be substantial (typically between 2 to 6 A at 12 V), meaning you'll require a sufficiently powerful power supply to use a Peltier element. These elements are often found in portable refrigerators and beverage coolers. In some cases, Peltier elements are preferred over conventional refrigeration systems because they lack moving parts that can break.
How Peltier Elements Work
When an electric current passes through the junction between two different conducting materials, one side of the junction becomes slightly hotter, while the other becomes slightly colder. This phenomenon was named the Peltier effect after the French physicist Jean Peltier, who discovered it in 1894. This phenomenon is also known as the thermoelectric effect.
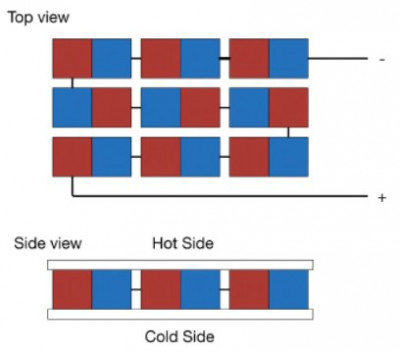
The thermoelectric effect is relatively small, so to make it useful, such as for cooling beverages, it needs to be greatly amplified. This is achieved by arranging groups of junctions one after another, so when current passes through, each junction contributes to the overall effect. Typical inexpensive Peltier elements have around 12 junctions. On both sides of the Peltier element, there is a base material forming the foundation for the groups of junctions.
The materials forming the junctions of the Peltier element are semiconductors of two types, similar to those used in the production of transistors and microchips but optimized for the thermoelectric effect. They are known as N-type and P-type semiconductors, with N standing for Negative and P for Positive.
Peltier elements have another fascinating feature: they can be used not only for cooling but also for generating a small amount of electrical energy when one side of the element is heated more than the other.
Practical Application Features
The main issue with Peltier elements is that their hot and cold sides are in close contact, so the hot side rapidly heats the cold side. To reduce this undesirable effect, heat must be removed from the cold side as quickly as possible.
A solution to this problem is the use of a heat sink (see figure below). Such a radiator consists of an aluminum plate with fins that increase the surface area for cooling, aiding in better heat dissipation. The cold side of the element is constructed as a block that fits inside the heat sink.
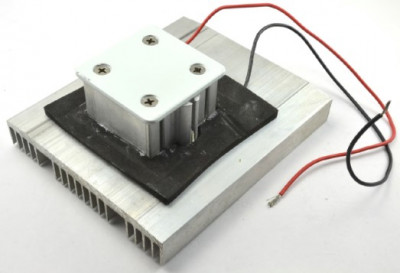
A simple radiator by itself is not as efficient as one with a fan. The fan carries away the heat from the radiator's plates due to convection and replaces it with fresh cold air. In practice, some devices have fans on both sides of the Peltier element, which enhances its efficiency (see figure below).
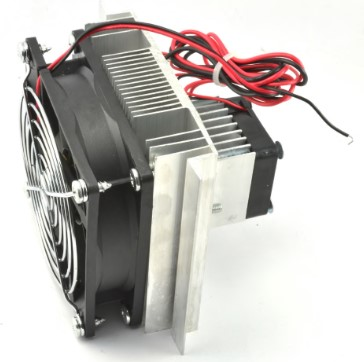
To make this happen, the current flowing through it needs to be substantial (typically between 2 to 6 A at 12 V), meaning you'll require a sufficiently powerful power supply to use a Peltier element. These elements are often found in portable refrigerators and beverage coolers. In some cases, Peltier elements are preferred over conventional refrigeration systems because they lack moving parts that can break.
How Peltier Elements Work
When an electric current passes through the junction between two different conducting materials, one side of the junction becomes slightly hotter, while the other becomes slightly colder. This phenomenon was named the Peltier effect after the French physicist Jean Peltier, who discovered it in 1894. This phenomenon is also known as the thermoelectric effect.
The thermoelectric effect is relatively small, so to make it useful, such as for cooling beverages, it needs to be greatly amplified. This is achieved by arranging groups of junctions one after another, so when current passes through, each junction contributes to the overall effect. Typical inexpensive Peltier elements have around 12 junctions. On both sides of the Peltier element, there is a base material forming the foundation for the groups of junctions.
The materials forming the junctions of the Peltier element are semiconductors of two types, similar to those used in the production of transistors and microchips but optimized for the thermoelectric effect. They are known as N-type and P-type semiconductors, with N standing for Negative and P for Positive.
Peltier elements have another fascinating feature: they can be used not only for cooling but also for generating a small amount of electrical energy when one side of the element is heated more than the other.
Practical Application Features
The main issue with Peltier elements is that their hot and cold sides are in close contact, so the hot side rapidly heats the cold side. To reduce this undesirable effect, heat must be removed from the cold side as quickly as possible.
A solution to this problem is the use of a heat sink (see figure below). Such a radiator consists of an aluminum plate with fins that increase the surface area for cooling, aiding in better heat dissipation. The cold side of the element is constructed as a block that fits inside the heat sink.
A simple radiator by itself is not as efficient as one with a fan. The fan carries away the heat from the radiator's plates due to convection and replaces it with fresh cold air. In practice, some devices have fans on both sides of the Peltier element, which enhances its efficiency (see figure below).
This project does not use either Raspberry Pi or Arduino. The project simply demonstrates how to connect a Peltier element and how to assemble a simple beverage cooler. We will later enhance this basic project by adding temperature control and thermal stabilization. Then, an OLED display will be added to show the temperature.
Components
For this project, we will need the following components:
Peltier element with two cooling fans (current 4A or less)
Adapter with a round socket and screw clamps
Power supply (12V 5A)
Large container
Refreshing beverage
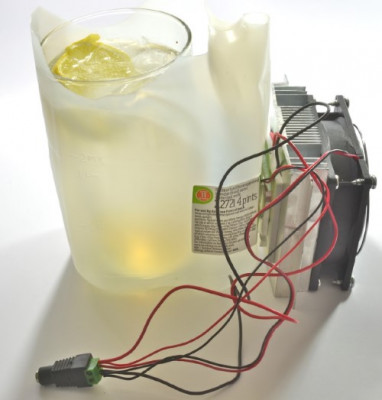
If a more powerful Peltier element is needed than the one listed in the components, use a more powerful power supply to ensure that its maximum allowable current exceeds the current consumed by the element. Provide at least a half-ampere excess for the fans and another half-ampere just in case.
Design
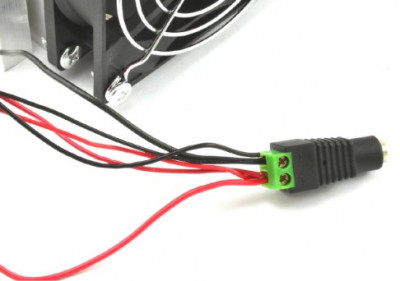
After examining the wires leading to the cooling unit, three pairs of wires can be identified: one pair goes to the Peltier element, and one pair each goes to each of the fans. They all require 12V from the power supply, and the simplest way to connect them is to use a screw clamp on the connector leading to the power block. In other words, all three red wires from the cooling device should be secured in the screw terminal marked (+), and all three black wires in the screw terminal marked (-), as shown in the diagram.
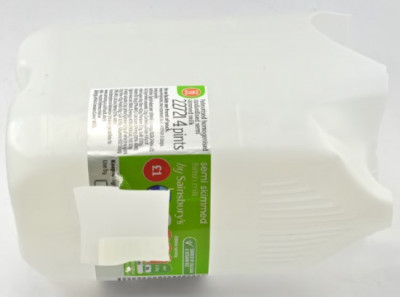
The lid of the plastic container, intended for cooling the beverage container, needs to be cut off, and a square hole should be cut in its side wall in such a way that the cooling part of the Peltier element fits snugly in this hole (as shown in the diagram above). The container should be large enough to accommodate your favorite glass or bottle for cooling.
If there are screw holes on the cooling side of the Peltier element for mounting, holes should also be made in the container to secure the element more reliably with screws. With the hole cut correctly, the bottom of the container and the base of the Peltier element will be at the same level, and when assembled, there will be no reason for the container to tip over.
A huge advantage of using one of the series of used plastic containers is that if a cut is made in the wrong place, you can always take another container and start over.
Operating the cooler
Once the entire assembly is put together, connect the power supply - both fans should start spinning, and if you put your hand into the container, you should immediately feel cold air coming from the smaller fan.
As calculations showed when attempting to boil water, even a relatively small amount of water takes a long time to change temperature. Although our cooler is capable of cooling a warm beverage, it is much better to keep the drink cool before use rather than waiting for a warm drink to cool down to the desired temperature.
This project is also somewhat inefficient, consuming 50W of electrical energy to keep a small amount of beverage cool. We will make our project more efficient by adding a thermostat mode in the future.
Components
For this project, we will need the following components:
Peltier element with two cooling fans (current 4A or less)
Adapter with a round socket and screw clamps
Power supply (12V 5A)
Large container
Refreshing beverage
If a more powerful Peltier element is needed than the one listed in the components, use a more powerful power supply to ensure that its maximum allowable current exceeds the current consumed by the element. Provide at least a half-ampere excess for the fans and another half-ampere just in case.
Design
After examining the wires leading to the cooling unit, three pairs of wires can be identified: one pair goes to the Peltier element, and one pair each goes to each of the fans. They all require 12V from the power supply, and the simplest way to connect them is to use a screw clamp on the connector leading to the power block. In other words, all three red wires from the cooling device should be secured in the screw terminal marked (+), and all three black wires in the screw terminal marked (-), as shown in the diagram.
The lid of the plastic container, intended for cooling the beverage container, needs to be cut off, and a square hole should be cut in its side wall in such a way that the cooling part of the Peltier element fits snugly in this hole (as shown in the diagram above). The container should be large enough to accommodate your favorite glass or bottle for cooling.
If there are screw holes on the cooling side of the Peltier element for mounting, holes should also be made in the container to secure the element more reliably with screws. With the hole cut correctly, the bottom of the container and the base of the Peltier element will be at the same level, and when assembled, there will be no reason for the container to tip over.
A huge advantage of using one of the series of used plastic containers is that if a cut is made in the wrong place, you can always take another container and start over.
Operating the cooler
Once the entire assembly is put together, connect the power supply - both fans should start spinning, and if you put your hand into the container, you should immediately feel cold air coming from the smaller fan.
As calculations showed when attempting to boil water, even a relatively small amount of water takes a long time to change temperature. Although our cooler is capable of cooling a warm beverage, it is much better to keep the drink cool before use rather than waiting for a warm drink to cool down to the desired temperature.
This project is also somewhat inefficient, consuming 50W of electrical energy to keep a small amount of beverage cool. We will make our project more efficient by adding a thermostat mode in the future.
