In this experiment, we will learn how to rotate the output shaft of a servo motor to a specified angle using both Arduino and Raspberry Pi.
For the Arduino board, there is a servo motor control library capable of generating pulses on any of its pins, so you don't have to use a special pin marked as PWM output. The servo motor is controlled through the serial interface monitor window, where you send the angle value to which you want to rotate the motor's shaft.
Generating precise pulse durations on Raspberry Pi is more complex than on Arduino. The Arduino board is equipped with hardware timers that generate the required pulses, while on Raspberry Pi, you have to generate pulses through software. Since Raspberry Pi has an operating system that can run multiple processes competing for processor time, the PWM pulse duration can sometimes be longer than required, causing slight trembling of the servo motor's output shaft. Therefore, in cases where high precision is needed, external PWM devices should be used (see "Project: Dancing Pepe Doll on Raspberry Pi").
Equipment
A remarkable feature of servo motors is that their motor control electronics are enclosed inside the drive housing, eliminating the need for separate H-bridges or transistor motor control blocks. All you need to do is connect the 5 or 6V power supply to the motor power contacts and provide low-level control pulses from the digital output of your Raspberry Pi or Arduino.
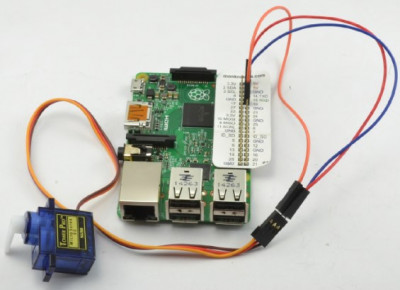
The diagram below shows the connection of the servo motor to Raspberry Pi. In this case, one of the servo motor horns is already attached (they come with the servo motor in a small package), allowing you to see the position of the servo motor shaft.
Components
For this experiment, you will need the following components to work with Arduino and Raspberry Pi:
- 9g servo motor
- Male-to-male jumper wires
- Female-to-male jumper wires (only for Raspberry Pi)

-
image.png (181.5 KiB)
Circuit for controlling the servo with Raspberry Pi assembly Viewed 26221 times
A small 9V servo motor should work just fine, powered by 5V directly from the Raspberry Pi or Arduino board. However, if you plan to control a more powerful servo motor, you will need an external power source, such as a 6V battery compartment used in previous experiments.
Arduino Connection
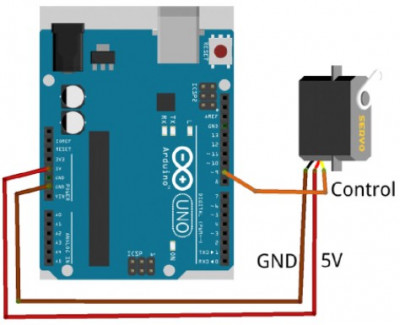
To connect the 3-pin servo motor connector to Arduino, use male-to-male jumper wires.

-
image.png (142.15 KiB)
Connecting the servo motor to Arduino Viewed 26221 times
Servo Motor Connection
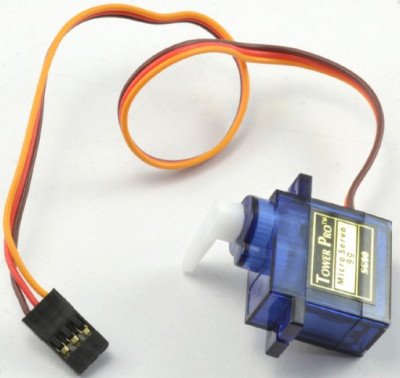
In the close-up image below, the servo motor and its connector are shown. As with many other servo motors, such a connector is practically a standard for all servo motor manufacturers. The purpose of the wires connected to the servo motor is determined by their color.
Wires almost always follow this order:
- Brown (sometimes black) - Ground (GND)
- Red - Positive power supply voltage
- Orange (sometimes yellow) - Control signal

-
image.png (236.61 KiB)
Servomotor and its connector Viewed 26221 times
Arduino Program
The servo library for Arduino is included with the Arduino IDE and takes care of all the heavy lifting when it comes to working with servo motors.
Here's the Arduino sketch for this experiment:
Code: Select all
#include <Servo.h>

const int servoPin = 9;   // (1)

Servo servo;            // (2)

void setup() {
  servo.attach(servoPin);       // (3)
  servo.write(90);
  Serial.begin(9600);           // (4)
  Serial.println("Enter angle in degrees");
}

void loop() {       // (5)
  if (Serial.available()) {
    int angle = Serial.parseInt();
    servo.write(angle);        // (6)
  }
}
You can, of course, use PWM and the `analogWrite` command to generate a pulse of the required duration for controlling the servo motor. However, this approach would involve changing the PWM frequency and restrict the options for controlling the servo motor to only those outputs on the Arduino board that can operate in PWM mode. This method is described later in the "Raspberry Pi Program" section, but on Arduino, it's simpler and better to use the `Servo` library.
Let's clarify some points in the sketch using the comments provided:
1. After including the library, the `servoPin` constant is defined as the output to which the servo motor control signal will be sent.
2. A variable `servo` of type `Servo` is declared. This variable is used whenever you need to change the position of the servo motor.
3. The outputs to be used for generating pulses are set using `servo.attach`.
4. The initial angle of the servo motor shaft is set to 90° (middle position).
5. Serial communication is started, allowing you to set the servo motor's angle through the serial port monitor.
6. In the main program loop, the sketch waits for the arrival of an angle value for the servo motor. Once received, it is parsed into an integer.
7. A new angle for the servo motor is set using `servo.write`.
Uploading and Running the Program
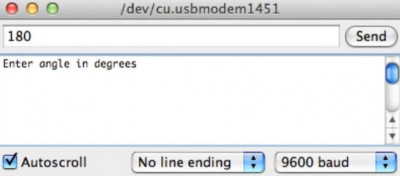
Upload the sketch to Arduino, and the servo motor's horn on the shaft will immediately take the middle position (90°). Open the serial port monitor window and try entering angle values between 0° and 180°. The servo motor will move to the new position whenever a new angle value is entered.

-
image.png (60.59 KiB)
Controlling Servo Motor Position Using the Serial Port Monitor Viewed 26221 times